|
|
|
R E S O U R C E S |
|
―
AURORA VIEWING & PHOTO HANDBOOK
― |
|
|
|
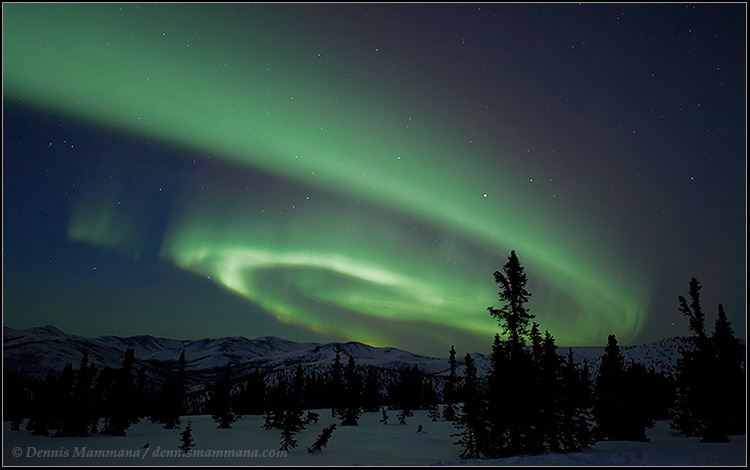
"Taking an aurora
photo is easy.
Taking a good aurora photo is hard!" |
|
Photographing the aurora is far from an exact science. The lights
can change dramatically in brightness and movement within seconds―or
they can hide entirely―and that makes it impossible to offer
anything but the most general guidelines.
During my
public aurora trips to Alaska, Iceland, Norway and elsewhere, I present tips and advice that extend far
beyond these brief notes, and I help travelers take the best aurora
photos their equipment will allow. In the meantime, check out
these notes so you're prepared when the lights come out! |
|
Camera
Body:
Almost any camera―either digital or
film―will work for photographing the aurora,
as long as you can adjust it manually to take
time exposures of
10-30 seconds or longer. An
all-automatic camera may not work well for
these photos, I'm afraid, but it's certainly
worth trying.
Digital cameras do a great job if you set them for a fast ISO (800,
1600 or
faster). Cold
temperatures will sap battery strength, so
carry spare batteries in a warm place, such
as an inside pocket, an change them out from
time to time.
And don't worry about using a light meter;
it usually will only work for your daytime
photos!
For shooting film, an older mechanical
camera body―one that doesn't use batteries
to open the shutter―will usually work best.
That doesn't mean that your automatic or
semi-automatic camera won't work. Always carry
plenty of
spare batteries.
[Dennis' Equipment: Currently I use a
Nikon D750 DSLR camera body for
shooting the lights.]
[Dennis' Recommendation: Any camera
that can be adjusted for manual exposures. For film, a
mechanical, all-manual camera body is best; many digital cameras also work well.]
|
|
Lenses:
Nearly any kind of lens will work for aurora
photography but, since the aurora can cover
huge areas of the sky, a wide-angle lens
would be a much better choice. Equally
important is that the lens be as 'fast' as
possible (i.e., have a small f/ratio like
f/2.8, f/2 or smaller). Without a fast
lens, exposures will need to be longer, and
that will tend to blur the aurora more.
Zoom lenses also work,
but they're not usually very 'fast'. Typically lenses don't provide sharp images
when used 'wide open', so if your lens is
extremely fast (f/1.8 or faster), it's a good idea to
stop down by 1/2 or one stop. Unless
you get a
tremendously brilliant aurora―very rare―you
won't want to shoot with your lens set any
slower than f/2.8.
[Dennis' Equipment: Currently I use a
Nikkor 14-24 f/2.8G ED lens for shooting the lights.]
[Dennis' Recommendation: Use a fast
(f/2.8 or lower) wide angle lens for aurora
photography.]
|
|
Filters:
Never
use a filter on your lens when photographing
the aurora. Depending on the kind of
filter it is, it can either reduce valuable
light or produce a series of dark concentric
circles in the center of your photo... and
these cannot be removed once captured.
[Dennis' Equipment: No filters]
[Dennis' Recommendation: Remove all
filters from your lens before shooting the
aurora.] |
Tripod:
This
is not the time to use a flimsy tripod. It
should be strong enough to hold the camera
steady for long exposures―even in a blustery
wind.
If you've got more than one camera but have
only one tripod, you'll spend lots of time
removing your camera and replacing it, and
you'll miss some great shots. Either take
along one tripod for each camera you've got
or add extra "quick-release plates" to
each camera. Don't overdo it; two
cameras should be
more than enough.
To beef up a lighter tripod,
hang your camera bag from the tripod's
center post. And, if you want to be able to
handle your tripod in very cold weather,
pick up some foam packing material or
insulating fabric and cover the tripod legs
with it. Your hands―even buried in
gloves―will thank you!
[Dennis' Equipment: Currently I use a
Gitzo Moutaineer carbon-fiber tripod and a Manfrotto 410 Head for shooting constantly
moving aurora.]
[Dennis' Recommendation: Always use a
sturdy tripod with quick-release plates, and insulate the legs.] |
|
Remote
Control
/
CABLE
Release/:
This is also not the time to skimp on a
remote control or cable release. A quality
device―whether for digital or film
cameras―costs a bit more but will work much
more reliably than an inexpensive one.
For a digital camera, an electronic remote
control is necessary to prevent vibrating
the camera when pressing the shutter.
Make sure you carry spare batteries in an
inside pocket since the cold can sap their
strength.
For a film camera, a
mechanical release should be the kind that locks, keeping the
shutter open for long time exposures.
It's wise to have at least one
spare since these can break or
freeze up.
[Dennis' Equipment: Currently I use very simple
Nikon wired and wireless remote switches
for my D750, as well as a CamRanger for
viewing scenes on the iPad.]
[Dennis' Recommendation: Have at least
two quality electronic remote control devices
or locking cable releases.] |
Batteries:
Few things sap the strength of batteries
more than long exposures in cold weather.
Keep at least one or two sets of spare
batteries warm in an inside pocket; if
you see the power level of the batteries
dropping, replace them with fresh ones―before
they die. And make sure you have spare
batteries for everything you'll be
using―camera, remote controls, digital
storage units, etc, and a charger. Cold
batteries will often regain their strength
after warming up again. Li-Ion
batteries tend to withstand cold better than
others.
[Dennis' Equipment: Currently I use
Nikon Li-Ion batteries for my Nikon
D750.]
[Dennis' Recommendation: Have
warm spare batteries (and a charger) for every
electronic device you have.] |
|
Digital:
The key to aurora
photography is a fast ISO setting for your
camera. ISO 800 or 1600 (or higher) work well for aurora shots, but the higher
the ISO number, the more likely there will
be digital "noise" in your images.
This is similar in some ways to film grain.
You'll need to experiment to see how far
your camera can be 'pushed'.
Since the color
response of digital cameras to light can be
controlled, the white-balance should be set
to "auto" or altered to
produce the colors that are most pleasing to
you. Or you can shoot in RAW format
and have more data and flexibility to make
adjustments later.
The real advantages of digital imaging
is the immediate feedback and the ability to
make changes quickly.
[Dennis' Equipment: Currently I use a
Nikon D750 to shoot in both RAW and JPEG
formats. I use the JPEG image to make
quick images for projection or e-mail, and
the RAW image to make high-quality images
for posting online or prints.]
[Dennis' Recommendation: Start with ISO
800
and increase it if necessary. If you
shoot in RAW, white balance isn't important
at this point.
If you shoot in JPEG mode, set it to "auto" and
make changes as you go to match your preference.] |
Film:
If
you're shooting film, the key is to use
fast film. This is represented by a high
ISO number: ISO 400, 800 and 1600 work great
for aurora photography. Various film types
respond differently to auroral light.
Which you use is a matter of
preference―you'll get as many opinions as
there are aurora photographers.
Some use Kodak films; others prefer Fuji.
If you like shooting negatives (for prints),
you might try using Fujicolor 400 or 800.
If you prefer shooting slides, you can try
one of the Fujichrome 400 films.
Slides can
provide more
natural colors than print film and, of
course, can be turned into wonderful prints
as well. When shooting with film, this
was always
my choice. And, since I bracketed a lot,
I planned on using 2 to 4 rolls per night; of
course, your numbers may vary.
[Dennis' Equipment: I no longer shoot
film, but have always prefer the response
and "look" of Fuji 400 slide film for
shooting the aurora.]
[Dennis' Recommendation: For first-time
aurora photographers, try Fujicolor 400 or 800 print film; for slides, try Fujichrome
400 slide film.] |
Digital
Memory:
Before capturing digital images of the
aurora, it's important to ask yourself what
your final product will be. If you plan to
use these for a website or e-mail, you need
only small, low resolution images. If you
wish to produce prints, larger files with
higher resolution will be necessary. Either
way, you'll need a fairly high-capacity
memory card for the camera, and at least one
or two spares. Yes, they can fail!
You can never have enough memory. To free
up your cards and to back up your work,
consider having a means for storing captured
images, such as a laptop computer or other
dedicated storage devices.
[Dennis' Equipment: Currently I use Lexar
Professional 32GB (600x speed) cards,
download images to my Acer Aspire V5-531
laptop computer and back them up to an
external 1TB Seagate Backup Plus Portable
Drive.]
[Dennis' Recommendation: Have at least one
spare memory card and storage devices to
which you can download and back up your images.] |
What
about Video?
Despite how bright and dramatic the aurora
can appear to the eye, it's nearly invisible
to even low-light or three-CCD video
cameras. High-end consumer video cameras
might see something, but will also display
quite a bit of noise. Remarkable aurora VHS
tapes and DVDs are available for purchase,
but these use supersensitive (read:
expensive) cameras!
One easy way of capturing time-lapse motion
pictures of aurora, however, is through
digital animation. By taking a series of
exposures with a digital camera fixed to a
tripod, one can use a variety of computer
software to assemble an "animated GIF".
While image sequences can be captured by
hand―with a timer to assure equal intervals
between frames―it's best to use an automatic
electronic intervelometer (available only
with some high-end digital cameras) to
assure precision. Even though it's only
necessary that individual images be
relatively small and low-resolution, a large
capacity and fast memory card is extremely
important.
[Dennis' Equipment: Currently I use my
Nikon D750 to produce many sequential images that I
assemble into time-lapse video with
Animation Shop software.]
[Dennis'
Recommendation: If you have a video camera,
you can certainly try it―you never know! Or try your hand
at digital animation instead.] |
Exposures:
These depend on a number of factors: what
kind of lens you've got, how fast it is,
film speed, aurora brightness and motion.
There is no way to predict the appearance
and behavior of the aurora, so only general
guidelines are possible.
To assure that something comes out, be sure
to 'bracket' your exposures―some over and
some under what you 'think' is correct. For
example, you might try f/2.8 at 10s, 20s,
30s, or some other range that assures you'll
get something. In other words, plan on three
or four exposures for every photograph until
you begin to see what you like. Better to take too many than not
enough.
With digital cameras, this is easy to do and
you can delete bad images later. If you're
shooting film, don't worry about "wasting"
it; film is inexpensive compared to
returning home with no aurora photos!
The following table offers some very
rough estimates to start out:
| |
|
|
|
|
|
f/ratio |
400 ISO |
800 ISO |
1600 ISO |
|
|
|
|
|
|
| |
|
|
|
|
|
2 |
15 sec |
07 sec |
04 sec |
|
|
|
|
|
|
| |
|
|
|
|
|
2.8 |
30 sec |
15 sec |
07 sec |
|
|
|
|
|
|
| |
|
|
|
|
|
4 |
60 sec |
30 sec |
15 sec |
|
|
|
|
|
|
[Dennis' Recommendation: Bracket well,
but keep exposures as short as possible to
preserve auroral detail. If the image
is too bright, change settings to darken it.
If the image is too dark, change settings to
brighten it.] |
|
Keeping
Records:
Digital
cameras record camera settings
along with the images but, if you're
shooting with film, be sure to keep an
accurate log of all important settings for
each frame. That way, when your photos are
processed, you'll know what produces the
best results for your next outing. This
will help considerably on your next night
out.
[Dennis'
Recommendation: Film shooters
should log details of all shots and study these after the shoot to
learn what works and what doesn't in various
situations.] |
Film Processing
and Printing:
If you shoot film, be sure to have it processed as soon as
possible, especially if you're away from
home when you shoot the aurora. If you
choose to wait until you get home to process
your film, make sure you take your aurora
photos to a custom lab.
If you shoot prints, your processor may not
know how to print your photos. You can find
a magazine or book with some good aurora
photos and lend it to the processor as
samples. Or you can shoot a 'normal'
daylight shot at the beginning or end of
each roll and tell the processor to use
those color settings for the aurora photos.
If you shoot slides, tell the processor to
leave them un-cut and un-mounted. You'll
then be able to compare your images, the
frame numbers and your notes. You can then
select the best images, mount them yourself
with simple cardboard or plastic mounts, and
have them printed or scanned.
[Dennis' Recommendation:
Always use a custom professional lab for
processing and printing your aurora photos.] |
|
To enjoy the aurora, all you really need is
your eyes and plenty of warm clothing and
boots. If, however, you wish to
photograph the sky show consider taking
along the following items: |
|
□
Camera(s) |
|
□
Fast normal and/or wide angle lens(es) |
|
□
Tools for minor repairs |
|
□
Memory cards or fast color film |
|
□
Lens cleaning supplies |
|
□
Good remotes or cable releases |
|
□
Flashlight covered with
red cellophane |
|
□
Sturdy tripod(s) & quick
release plates |
|
□
Spare batteries for
everything & charger |
|
□
Equipment manual for
everything |
|
□
Laptop and backup digital
storage device |
|
□
Knee pads when viewing
at low angle |
|
□
Chemical hand warmers |
|
□
Gaffer's tape |
|
□
Note pads (or logbook)
and pen |
|
|
EXTREMELY
IMPORTANT:
Learn to operate everything well in advance,
and be sure all works well. I
cannot emphasize this enough... unless
you're a pro at working under cold and dark
conditions, this will help more than you can
possibly know. You may
even consider having your cameras
"winterized". And be sure to take a
spare of everything that could possibly
fail. Remember: "Murphy" is an
aurora fan too! |
|
And be sure to visit my
Sky Photo of the Week
archives to see the types of photos that
are possible with only a simple camera and
tripod! |
|
― Dennis Mammana
2015-02-06
|
|
|
|